
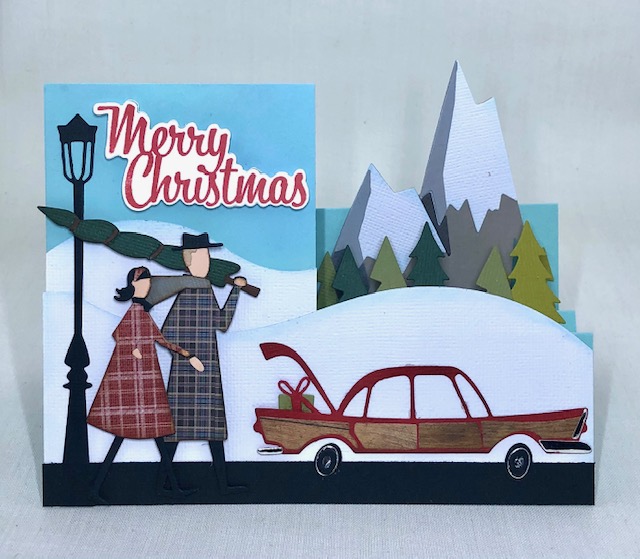
It has been a super busy month! We finally got our card kits packed up and mailed so I can start sharing some of what I’ve been doing the last few weeks. This side-step card uses quite a few die cuts, but if you are patient and give your arm a break every once in awhile, it will go together fairly easily =). The finished size is 5″ x 6 1/2″ and should fit in an envelope sized for a half-fold card.
Materials:
Die sets: (all are Tim Holtz for Sizzix)
Alpine- 664225
Christmastime- 664731
Home for the Holidays- 662419
Christmas Memories- This is an older stamp and die set that I can’t find a number for. It is used only for the sentiment on the front of the card
Various card stocks in your choice of colors
Steps:
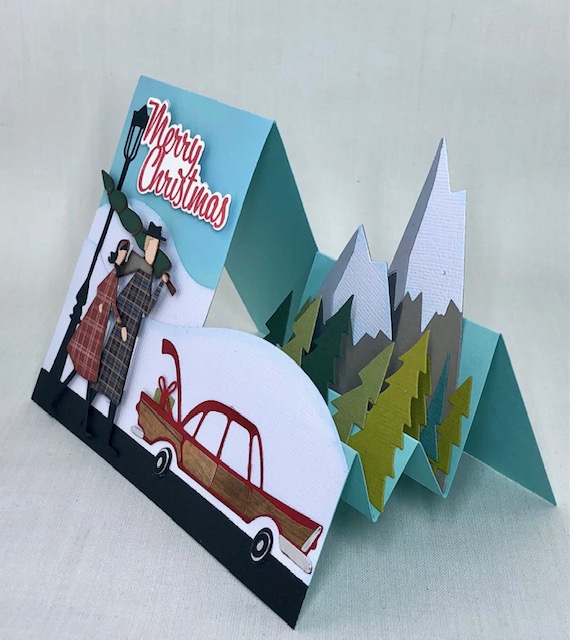
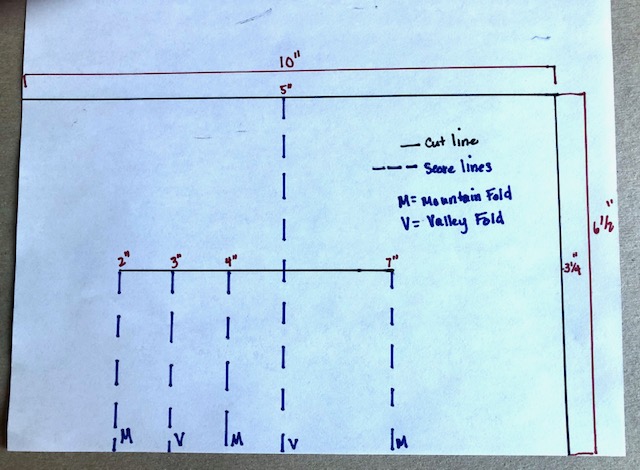
- Make your card base. Start with sheet of card stock 10″x 6 1/2″. Make a cut along the 3 1/4″ halfway point of the card, starting at 2″ and ending at 7″. (See diagram- Left side on diagram will end up being front of card). With the 10″ side along the top of your scoreboard, score at 2″, 3″, and 4″ just to the cut. At 5″ score completely across the card. Finally at 7″ score just to the cut line. Fold along the score lines following the diagram for mountain folds and valley folds (see finished photo above)
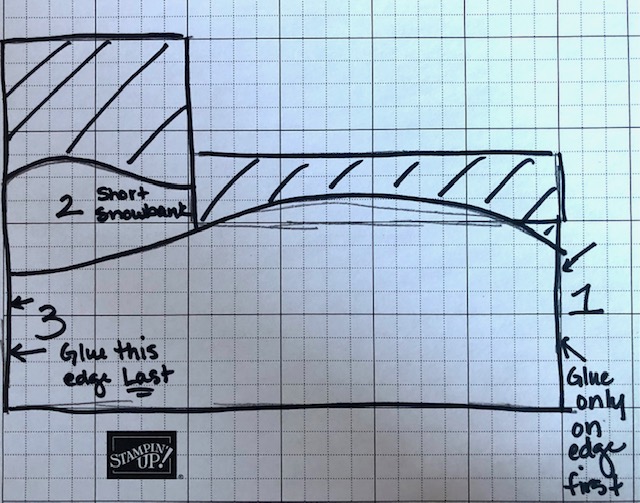
2. Make your snowbanks. Cut a piece of white card stock 6 1/2″ x approx. 3″ Use a curved edge die or free hand cut a curve along one of the long edges. Cut another piece of white card stock 3 1/4″ by approx. 3 ” and die cut the curve along a 3 1/4″ edge using the curved die from Home for the Holidays. When attaching these pieces to the front of the card, start with the longer snow bank and just attach it on the right side of the card. Figure out where you want the smaller snowbank to sit (it will tuck under the left side of the longer snowbank) and glue it down before attaching the left side of the longer snowbank on top of it.
3. Die cut the mountain and trees from Alpine, the car and some trees from Home for the Holidays and the people and street lamp from Christmastime. I used plaid papers for the clothes on the people and paper pieced them but you can always just cut them from white and color them. Paper piercing them does take quite a few passes through the machine my arm could tell you…lol.
4. Cut a strip of black card stock 6 1/2″ x 1/2″ and glue this strip to the front of the card lining it up with the bottom edge. Attach the lamp post on the left front of the card. Attach the car and its wheels to the right side of the front of the card. Pop up the people (using foam dots) in between the lamp post and the car. Attach the mountain and some trees to the back, largest “step” ( you may need to trim a little from the bottom right side if it ends up sticking out a little). Attach trees to this step as well as the middle step as desired.
5. Stamp and die cut the sentiment and pop it up on the left side of the card
6. Cut a piece of white card stock 6 1/4″ x 2 3/4″ to use as a liner on the inside of the card.
Whew, it is quite a lot of die cutting, but it does come out cute. It was nice to mix some of my older sets with some of the new ones. Hope you like this one. Hoping to be back in the swing of things with some new projects over the next few weeks. Have a fantastic week everyone! -Lisa
